Showing posts with label Work in Progress. Show all posts

5/1/14

Some more process photos.


Applying bole. Bole is a very fine clay, in various earth colors, that when mixed with hide glue becomes the base layer and adhesive for water gilt gold. The color above is a mix, to match the color on the original frame.


Water gilding. The surface is wet with the "gilding liquer", water and some alcohol to break the surface tension. The polished bole is wet thoroughly, and the gold leaf is applied by picking it up with the tip, that wide flat brush, and almost slapping it on to the wet surface. To make the tip grab the leaf, I rub a tiny amount of vaseline on the back of my left hand, then lightly brush the end of the tip over my hand before grabbing the edge of the leaf with the tip. Sounds simple enough.


When the gilt areas are dry, they are burnished using an agate tool. To test for dryness, the surface is tapped with the agate; when a hard click is heard, the surface is dry. Trying to burnish wet just destroys the leaf. Two different shaped burnishers on the bench.

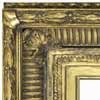
Burnished gilding and stained wood, with the color sample to match to. Waiting for the finish coat.


12/22/13

Odds and ends.


A corner of the studio. Most of my painting is done at the small drafting table, though there is an upright easel, that is affixed to the wall.


The easel with one panel of a tryptic having some of it's gilding touched up. The table to the right has an automobile jack as a lifting mechanism. Hanging on the left side of the easel, a leather bag that usually has my watercolor kit in it.


A small commission of two awards I designed and manufactured. Top, mahogany, bottom, black walnut with a carved and gilt panel. The bottom is waiting for it's name plate

5/6/13

Reason for slow posting


93 1/2  x  69 1/2  x  3" frame in the center of my main workroom. Plastic film has been pinned up to keep overspray off of tools, etc. I'm using my table saw, sans blade, etc. as one bench, and my actual bench at the other end, both covered in drop cloths. The outer frame has been blocked up to separate the inner from it, and to keep it from sticking to the cloths. My exhaust fan has done a very good job of pulling the overspray out. Large frames are not only larger, but add  some very real logistical difficulties.

I also usually tell myself when doing a large frame, sometime in the process, that I'm not going to do it again. I, of course forget that when I'm presented with another challenge. 8-)

Click on the Lincoln frames label at the right to see some other large frames.

5/27/12

A Few More ...

Nice windows, nice corbells. The next has similar windows, is in much better shape, and also has some fine Corinthian columns, unless they're Doric, or maybe Ironic. 8-)


An unusual window pattern:


And, some frames, raw, lest you think all I do is wander around taking attic window photos.

12/27/11

And .... again.


And ... better .....

A little more of the aluminum leaf is showing, and the color is closer. I may be done?

12/26/11

Changes in frames


Both of these paintings have had the finishes on the frames modified. I'm pretty happy with the top one; a stippled on wash of raw umber, then some rottenstone with yellow ochre added. I'm a little more ambivalent about the bottom one; I like the "dryer", duller feel, but the scumbled on color ... I may need to soften it, though I will hang them back up and see how I feel in a day or two. Both of these finishes have antecedents in the modernist frames of the 1940s and 50s, such as this one: Peter Blume at The Art Institute.

7/26/11

More variations on a theme.

Some frames in a mid-nineteenth century style, not exact reproductions. I've designed every aspect of them; all of the ornaments were chosen for reasons, or were designed and made by me for an overall design. They are in a style, but not reproductions. I will expand on that more when they are done, fitted to the paintings, and I have some images of the whole. 

One of the two frames "dominating" the studio at the moment. The burnished bits have been gilt, and the corner in the foreground has been burnished. Once the burnishing is done, I'll seal the rest of the frame with a colored shellac, a pale yellow, ocher like, though much softer. The matte areas, everything not water gilt, will be oil gilt. Water gilding allows the gold to be burnished into the bole, ( dark gray bits) producing a shiny, reflective surface. This contrasts with the matte areas. Oil gilding produces a more matte, matte gold than all water gilding.

More later, especially after I finish these two.  These two have had a higher than usual number of problems; none insurmountable, but every step seems to require some solutions, thought and remembrance. Well, the broker of the commission said, after stopping by to see them, that he thought they were going to be gorgeous. Glad he said it; I can't until they're done. (Being the one who wrestles the problems, it can be months after a project before I can see clearly that it turned out well).

If the liner seems "out of place", that's because it is; it has been raised on blocks inside it's outer frame for "access".  My work space is small; I need to be creative.

6/3/11

Big and bigger.


Current dust; a big frame in the background, and an even bigger frame foreground. The foreground one is on my assembly/joining rig.

10/15/10

Work in Progress


One of several egg tempera paintings I'm working on at the moment. Untitled, as of yet, 6"  x  12", on a panel.Traditional gesso.And the photo was done quickly, and is ever so slightly off. Once it has a frame, I will spend the time to photograph it properly.

Loosely based on a watercolor of mine. One of the pleasures of egg tempera for me is the subtle changes that can be rendered by glazing; and the glazing can be done in cross-hatching, scumbling in a color, or even air brush. Sometimes the paint is just "pushed" around. Unlike oils, there is no tendency to produce mud by repeated working of a passage. 

The painting is nicer in person than on the interwebs ...

Addendum to a previous post. Here


I'm pretty sure the last three words on the top line are: "laid to rest". In the bottom line, the last words are? "all their country? wishes blest. I've jacked up the contrast and sharpness for this file. I've thought of doing a rubbing, but I suspect that doing a photo as I did, with a corded flash at a right angle to the stone is just as good. Help would be appreciated; I have several raw files; if there is anybody who reads my meanderings and is interested in this sort of thing.  It's just an itch I feel like scratching. This small cemetery went through a period of neglect, but seems to be being cared for now, and my interest in that bloody war continues unabated.