Paul Butzi, Musings on Photography, "The Cult of Done".
From Bre Pettis.
Check him out.
3/24/09
Art Deco Picture Frame
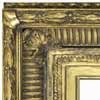
 This is a delightful small Art Deco frame, in the geometric style. 10 x 13 rabbet size, about an inch and an eighth wide, probably meant for photographic portraits. Two of the samples I've seen have had photo portraits in them. Because I've seen three of these, they must of been somewhat mass produced, but they are very much a hand made object. Looking at the back, instead of the normal eight cuts for the four joints, we now need sixteen cuts for the eight joints, as seen below.
 The geometric ornaments appear to be composition. Looking at the top image, full size, the cracks common to aged composition ornaments are visible. A metal leaf finish, with four different colors of paint, and the toning, and wiping to produce the different "textures". I'm very impressed; none of the work involved in this "simple" frame is easy . The design, itself, is just a delight; so evocative of the 1920's. Below are some finished art deco designs, inspired by this frame , and some other items in my family collection. Art Deco incorporated the modernist geometric, but also took art nouveau forward, using the geometric placements, but with the sweep and flow of nouveau.
3/23/09
An unusual frame.


One of my paintings, an egg tempera on panel, titled "Morning". The frame is very specific to the painting. The frame is carved basswood; the spikes or thorns are birch dowels, glued into holes in the frame. Gesso and polychrome. I wanted rough and sharp; prickly is a good term. I also wanted a slight imbalance; to give the overall piece an "edge". The gesso was sealed with a red pigmented shellac. Acrylic paint was used for the basic color, then a wash of Japan color in V,M & P Naptha. This was allowed to dry, followed by a dusting with rottenstone which was colored with a little yellow ochre pigment. Rottenstone is traditionally used to add some age to frames, as it very much looks like real, age applied dust. Rottenstone is a traditional polishing agent for finishing, for furniture as well as frames. About the only "modern" material I use regularly are acrylic artist paints, and sometimes latex house paints. Hide glue, shellac, oil sizes, Japan colors, rottenstone, are all very old materials. There are two other modern materials I use; cyanacrylate glue, "super glue", and catalyzed polyester resin. More on these later.
3/22/09
" A Life in Art "
A very well thought and written piece on the artistic life over on TOP. The Online Photographer. The piece is by the author John Camp, whose nom de plume is John Sandford. Some very good commentary, as well. On all of the arts.
3/21/09
Carved corner stencils
 Some stencils for laying out carving patterns. This is the traditional method used. Small notches for marking the frame with a pencil, flipping for the opposite side.
Here's one from the Archives of American Art; a Foster Bros. stencil, here.
2nd. from left at the top.
Another method would employ a chalk bag, pounced on a pounce pattern. The drawing is "traced" with a small wheel, set with sharp pins, perforating the paper. The chalk marks the frame below through the small holes. My method of choice is a computer print, allowing me to rapidly alter dimensions. See the post from 3/11/09, A New Design.
3/18/09
Dates on Art
I was in a meeting the other day concerning an upcoming exhibition. The artist had signed his work, but not dated it. This left all involved in the dark as to an evolution of this artist. The discussion led to asking the "artists" present if they dated their work. At one time, I did date frames and art, and also kept comprehensive records. But, for a variety of reasons, I am now not as meticulous. I sign work, but with a monogram, usually, and occasionally a full signature, but no dates. Nor do I keep records, as I once did. When asked about not dating art, I flippantly remarked that laziness was the reason, though in retrospect, that is a very valid reason. The time involved in records, in adding a date, as opposed to a simple monogram, or even a signature, seems wasted. Also, some times a piece will sit, untouched, for a significant length, before being finished, although the final "finish" may be very minor. Which date? The art historians, curators, may feel this is important, though, for myself, I would rather think about, and spend my time working, or navel gazing, than being a bookkeeper.
I am going to think about putting dates on my work, again.
Addendum: Dates are OK, but I think what I'm really voicing is the realization that doing the art is important, but after that, its historical or aesthetic significance, is beyond my control.
I was just looking through a book on Native American Art, and some cultures achieved an economic point where there was an enormous amount of time that could be devoted to "art", decorating clothing, one self, and flamboyance. I think we've lost that in the new millenium. Native cultures did not date their art.
Bron
3/15/09
Design Variations
 This is the same design for corner carving, but on very different moldings. The pale version, top, has a rounded panel for the carved area, with a gesso textured ogee leading the eye down to the painting. The bottom version, warmer leaf, is flats and steps, with a smooth panel. My work flow has been developed to allow this kind of creative flexibility. It's not always efficient, but....
3/11/09
A New Design
A new design, very 3 dimensional carving, showing the design and manufacture process. This particular frame is leafed in aluminum leaf, gesso texture on the ogee, with a yellow green sealant and tone.
For the carved corner, I usually start with a rough sketch, done to size. At this point, I'm working in a traditional, draftsman's approach, tracing when I need to start over, freehand drawing within a set size.

Below is the final drawing, a simple, organic S and C scroll design, with a deep 3D effect.
 Now I get modern, and scan the drawing into the computer, where it's duplicated, flipped and combined to produce a carving pattern. During this process I can alter the size of the pattern, for different size moldings and frames. I also design the moldings to be used for the frame.

Molding design, top of drawing shows the outer frame, and the blind frame. Bottom, upside down is the inner frame design. This is a working drawing to size, for setting up the machines to do the milling. I find them aesthetically interesting, beyond the work aspect, though they are not done with ANY aesthetic intent.

The pattern is printed, then cut out and glued to the frame corners with hide glue. When dry, I carve through the pattern. Hide glue gesso is brushed on for the first coat; subsequent coats are sprayed. For this frame, a heavy, gesso texture was stippled onto the inner frames ogee. Sanding, then a pigmented shellac is brushed on, in this case a soft, Indian Red, clear shellac sprayed, then the sizing, leafing, sealing and toning. Prior to sealing, on occasion, the leaf is "rubbed through" to the ground color. The "rubbing through" may also be done at the end of the finishing. When rubbing through prior to sealing, solvent on a rag, acetone, alcohol, or mineral spirits, will both smooth the leaf and rub through. My sealant of choice is shellac, either clear or amber, and sometimes with additional colorants added. Toning is with Japan colors, thinned with V,M, & P Naphtha, mineral spirits, or turpentine, depending on drying time needed and the ultimate finish. When the tone is dry, other effects may be applied, such as flyspecking, dust, and general physical abuse, or "antiquing".

For the carved corner, I usually start with a rough sketch, done to size. At this point, I'm working in a traditional, draftsman's approach, tracing when I need to start over, freehand drawing within a set size.

Below is the final drawing, a simple, organic S and C scroll design, with a deep 3D effect.
 Now I get modern, and scan the drawing into the computer, where it's duplicated, flipped and combined to produce a carving pattern. During this process I can alter the size of the pattern, for different size moldings and frames. I also design the moldings to be used for the frame.
Molding design, top of drawing shows the outer frame, and the blind frame. Bottom, upside down is the inner frame design. This is a working drawing to size, for setting up the machines to do the milling. I find them aesthetically interesting, beyond the work aspect, though they are not done with ANY aesthetic intent.

The pattern is printed, then cut out and glued to the frame corners with hide glue. When dry, I carve through the pattern. Hide glue gesso is brushed on for the first coat; subsequent coats are sprayed. For this frame, a heavy, gesso texture was stippled onto the inner frames ogee. Sanding, then a pigmented shellac is brushed on, in this case a soft, Indian Red, clear shellac sprayed, then the sizing, leafing, sealing and toning. Prior to sealing, on occasion, the leaf is "rubbed through" to the ground color. The "rubbing through" may also be done at the end of the finishing. When rubbing through prior to sealing, solvent on a rag, acetone, alcohol, or mineral spirits, will both smooth the leaf and rub through. My sealant of choice is shellac, either clear or amber, and sometimes with additional colorants added. Toning is with Japan colors, thinned with V,M, & P Naphtha, mineral spirits, or turpentine, depending on drying time needed and the ultimate finish. When the tone is dry, other effects may be applied, such as flyspecking, dust, and general physical abuse, or "antiquing".

3/3/09
ART
 A response to the post below, 3-2-09
I paint, carve and photograph. I consider the camera a sketch tool, but will sometimes get results that are transcendent of a sketch. The transcendence comes not through "luck", but rather seeing something at the moment, and then bringing to it my experience, energy and thought. Talent is highly overrated, without some energy and thought.
If I do a painting based on a photo, that photo may be the culmination of much time at that location; the painting an amalgam of memory, many photos, and the experience of that time and place. And no part of that, including sweeping the floor in the studio, or a crisis of spirit that sees me going for a long walk with the dog, is not ART.
Addendum: It's all part of the process. I like the idea of art, not ART, no pedestal, thank you. Craft and art are one to me, one process to make something. Others make distinctions, make value judgements as to craft vs. art; I can't dispute some of the distinctions; me doodling on a pad is not as important as a piece with thought and labor expended on it, but I see little distinction between the effort to design a table and that effort on a painting. Or tuning a photograph.
Bron
3/2/09
Art?
Paul Butzi, at Musings on Photography, has a very good post on Art and Artists.
Art, Lost and Found.
Good comments, as well.
Bron
Art, Lost and Found.
Good comments, as well.
Bron
3/1/09
Classic Whistler frame

Classic whistler, a design that continues in use to this day. The combination of beads and flats can produce a multiplicity of variations. This example is made from four frames of basswood; the inner, a small cove, then 2 beads of ascending size, narrow flat between , with a larger flat leading to the middle frame. The middle frame has a quarter round face, beaded, with a flat leading to the large, outer frame, beaded, with a small flat seperating the quarter round faces. The fourth frame is a “blind frame”, a frame hidden to view on the back of the main frame. It is used to make the thickness of the main frame larger, as well as providing increased structural integrity. The three visible frames are mitre joined, while the blind frame is butt joined, glued and nailed to the back of the main frame, thus overlapping the mitre somewhat. Mitres are the weakest of woodworking joints, but a neccesity for molded frames.
My method of choice for the beading, is a combination of milling and hand work, utilizing a scratch stock for the beads. A scratch stock consists of a handle holding a flat steel “blade” and an adjustable fence. The molding stick is shaped in the desired quarter round shape. The scratch stock, with a shaped blade is pulled over the stick, scraping the bead. Properly set up, the bead is actually cut into the wood, like a plane, producing tiny shavings. I generally mill the flats first, and use them as a register. As the beads progress down the face of the stick, previous beads act as a guide for the new beads. Even though basswood is a relatively neutral wood, usng a scratch stock will sometimes produce a ripple in the bead; something I've spotted on original frames.
The most common finish I have seen is a matte gold leaf, and rarely, water gilt gold leaf, with the beads being burnished. Frequently, the outer vertical part of the frame is painted, in a very soft, yellow ochre, or even black.
Bron
Subscribe to:
Comments (Atom)


