First, a clever idea for holding a lighter camera. A finger strap. Never heard of them, but with the a6000, and the finger strap over my right, middle finger, the camera is secure, and very usable, without really having a grip on the camera. It's wedged in, and very movable, but secure. I like them far more than wrist straps. In the above image, the one on the camera is a cut off neck strap; beside it a paracord one using a "friendship" aka a "diamond,"or "lanyard" knot. Very simple and easy to remove, as the loop just slides through the strap ring, and is held between the knot and the finger.
Complaints about the camera are few, and minor, such as the SD card is difficult to remove, as it is tight to the card and battery door. Turn off wireless, through airplane mode, if you're not using it, as it quickly depletes batteries.
Hi-speed drive mood is fast enough to shoot five frames with one quick shutter depression, two frames in mid, and one in low.
I was unhappy with face recognition; it kept focusing on the wrong face. However, one can register faces for the camera to focus on, and arrange those registered faces in the order of preference. Next time.
I've mentioned the three memory slots for custom settings which are great. There is also an app for smart phones that allows the phone to be a wireless control for the camera, including remote shutter release. However, it doesn't seem to work when the camera is in memory settings mode. Either I'm too dumb to figure it out, or Sony needs to write that into a firmware update. Memory mode is one of the times remote relase is useful.
Very pleased with the two lenses, 16-50, and 55-210, noting that they are "kit" lenses, small, light, and affordable, but with some compromises. The more I use and learn the camera, the more pleased I am. Coming from canikon cameras, I have some occasional moments of befuddlement, but they tend to brevity.
More, later.
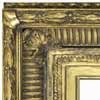
Some photos of the process with the big frame in the post above.


The images above showing various aspects of making the moldings, specifically cutting the coves. The ten foot lengths required some logistical dancing, often moving some machines daily.

First cuts of the cross grain fluting. The molding is top to bottom above. Depending on the wood, flutes might require from 2-3 to 6-7 passes to get a clean flute. The carving was done while the moldings were still in sticks. After assembly, the final molding, on the top of the large cove, and ornamentation was applied.

Frame upside down, showing the corner overlay braces, splines.

I used plywood for the "blind" frame, for greater stability.

Finished, and wrapped awaiting transport.