Back in the day, yeah, back when the internet was steam powered. Here. Aaron Johnson is quite good, funny, too.


 In the previous post, I discuss a mitred frame. This frame is an example of a "butt-joined" frame, using a mortise and tenon type joint, with out nails.
 For the tenons, I use a double biscuit. Biscuit joinery is a fairly new addition to joinery, requiring a machine to mill the mortises, then using a compressed wooden "biscuit" as a tenon. The biscuits swell from the moisture in the glue, making for a solid and durable joint. Very quick to do; faster than dowells, and I think stronger.
 Once again, unto the fray. I've redone this frame, see here, and here. I've been brooding about this frame, and I'm closer now than in any of the previous iterations, though this may not be the last version. I even dug out my studio lights, polarizing screens, and polarizer to try and eliminate the glare in the photo; only about 90% success.

 I've redone this frame, see here, making it more balanced. It retains some of the previous iteration, whlie being less overt. It is a more subtle presentation. Hah! The overall tone of the frame might be a little darker, as well, though this is a more accurate photo than the previous.
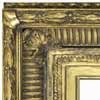
 Above, shows the inner frame, for the frame below, with the red and yellow bole application. The inlet splines I install on certain frames, is visible at the lower right. The frame below has a blind frame installed. The spline still needs to be planed flush with the edge of the frame. That will be done after the final toning of the frame, just before the two frames are assembled.
 Gessoed frame, lacunae filled, ready to be refined and sanded. Refining involves cleaning up edges; making rounds round, and making sure the sweep and flow are there. I use small carving tools, scrapers and rifflers at this point, as seen above. Then sanding with various grits, 80-100-150 and finishing with 220. Mostly 100 and 220, and 100 needs to used carefully. In the winter time, I have another use for cyanacrylate glue; gluing the splits in my fingers together, aggravated by sanding.
 This is the frame as the first coat of bole is being applied; a pale yellow. Bole is a very refined clay, mixed with hide glue just before applying, as a base for water gilt gold leaf. Where it is shiny in the picture, the bole is still wet. Before gilding, the bole will be polished, but it is matte until then. In this case, a base of yellow, followed with a red top coat. The yellow obscures "holidays" in the gilding. The red will be just on the "highlights".
 This is a very unusual frame, done from a photo of a frame from 1920s-30s. Gilt with metal leaf and polychrome panels. The ornamentation is poured Bondo, oops, CPR. See the previous post. Regular Bondo with the addition of liquid fiberglass resin, is "pourable" but mostly non-flowing. It will gel, and stay in position. I've used this kind of poured ornament on several frames as an alternative to conventional ornaments.
 This is the image I was e-mailed, to work from. I'm not sure what the material used for the poured ornament is on the original, probably a gesso with oil added.