Showing posts with label Restoration. Show all posts

9/9/13

Recent project


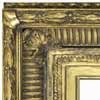
A recent project, one of three deeply ornamented plaster frames, circa 1900, give or take a few decades. The original finish was water gilt karat gold high lights, and then bronze powder for the body. Either painted or dusted over an oil size. Two of the frames were at some time completely over painted. One, had it's original finish; the gold still visible but the body had tarnished to a deep brown. I've seen the deep brown, but also various shades of a muddy green, and a dull greenish gold. The frames had been stored in a basement for many years, with a lot of moisture damage. Corner ornaments were loose or missing, because of separated mitres, and much of the running ornament at the outside back edge of the frame was beyond repair, needing replacement.


These two images are of one of the frames installed as a "frame" for a wide screen TV. The TV is in a recessed area in the wall over the fireplace.The bright windows are due to a foggy day out over Lake Michigan. We're 40 some stories up.


This one, with a mirror, was installed into an alcove, that was not quite an 1 1/2" wider than the frame.  Just one of the many challenges. Here, trying to not smash fingers was the trick. 

Hanging hardware was plywood cleats, attached to the hollow wall with either 1/4"  x 20 zip toggles, or in the case of the TV frame, fine thread drywall screws anchoring into the metal studs of the recessed area. All of the frames were heavy, and this, with mirror was quite heavy. I chose plywood cleats because then I could build out the frame cleat with full size spacer blocks, of various thicknesses of plywood, to accommodate the inner frames sticking so far out the back. 

The painting was not hung, as I, having not seen the space, brand new construction, did not know that the customer desired it to hang in a stairwell. I found this out the afternoon before delivery and installation. Stairwells require special equipment, and hanging a painting and frame, 4'  x  7', and that probably weighs a hundred pounds, is very special. This job requires a 24" wide plank rated for a minimum of 500 pounds; not something that I keep in my tool kit.

The restoration of the frames was originally to be repairs, then regilding in metal leaf. As I got into them, I decided to remove the overpaints on the two frames that had been overpainted. Under the paint, there was a lot of the original gold. Rather than cover that over again, all of the highlights were cleaned of overpaint with acetone and sometimes paint remover, and sometimes lacquer thinner. New water gilt gold was applied to repairs, and bad areas of loss. The body was finished with a shellac based paint, using both mica pigments, and a small  amount of bronze powder pigment. Couldn't achieve the gold I wanted with out it. Most of the frames with the bronze powder finishes for the body, were at their glossiest, only semi-gloss, to achieve the look of matte and burnish gold. I tried for the same effect, a soft, matte body with the mirror like highlights. I was trying for 120 year old frames, with some wear and tear, but in very good shape.   

8/5/13

Heavy, plaster ornaments.


I'm working on some frames from late 19th. century or early 20th. The heavy, deep, and severely undercut ornaments are in plaster. In order to make replacements, with the materials on hand, I'm basically molding and casting just the tops of the missing ornaments. In the picture above, a top has been positioned with the help of some screws.


Here, I've built a dam of masking tape, prior to filling, through the front, with plaster, the undercut parts. There are wire reinforcements through the "top' castings.


Another ornament top, showing the positioning screws, and the reinforcing wires. The "tops" are resting on the screws, glued into position with cyanacrylate glue.


And the above ornament with the masking tape dam. When the bottoms are filled, essentially I'll be carving the replacement ornaments, using the tops as a guide, along with the remaining parts of the original ornaments.

What you are seeing in the above photos is the original finish applied to this frame. Water gilt karat gold for the highlights; then a bronze powder pigment paint for the body. The bronze powder has tarnished  to the point of being dark brown. Sometimes they tarnish to a dark, earthy green. I'm going to restore the karat gold as needed, and then repaint the body, using non-tarnishing mica powders for the gold pigment, in a shellac medium.

In the last two photos, plywood overlaid splines are visible, to reinforce the miters. I've added hide glue where I could, but these are very difficult frames to disassemble, as the ornaments, and wood substrate are often cross nailed, and there are numerous reinforcing nails for the cast ornaments. So, the add on splines.

Musing on the technology to produce these type of frames, I'm assuming that the ornaments were cast using rubber molds, that could be pulled free of the undercuts. Corner ornaments were probably cast last. Interesting frames, and somewhat rare compared to composition ornament frames, though this methodology is the only means to produce these heavy, and undercut ornaments.

12/23/11

Repairing a broken ornament.


This ornament is the only one of the four corners still there, though it is broken and loose, held on by the nails that the composition was anchored too. Sometimes I can get the ornament back in position but this one was stubborn.  In the next photo, below, I've removed the broken part so I can clean the fracture and remove the nails.


These last three photos show the back. For reinforcement, and to replace the now missing nails, I cut some slots using a saw blade in a Foredom tool, (a fancier Dremel tool) Thin welding rod will be cut, and glued into the slots, cyanacrylate, both to glue the ornament and the rods. The next photos show masking tape in the perforations of the ornament, and the the slots and lacunae being filled. I'm using catalyzed polyester resin, more commonly called Bondo as the fill material.


Once that is cleaned up I'll do what repairs are needed to the face so I have a corner to make a mold from. The next photo shows the top of the ornament with its undercut. This would have been cast separately, as will the replacement ornaments.


The last photo shows the top of the ornament ready to be molded, with a plastilina dam surrounding it.

Mold material will be alginate; ornaments will be cast from Bondo, thinned with liquid resin.